Vanta Setup Guide
Follow this guide first to download Vanta, prepare your capture source, verify console settings, and set up your PC capture option.
Downloads
Vanta
Download the latest version of Vanta:
- Vanta
Main Vanta desktop application.
Virtual Controller
Download these only if you plan to use Virtual Controller output or XStreaming Desktop:
-
ViGEmBus
Required for Virtual Controller output. -
HIDHide
Used to keep your controller list clean when using Virtual Controller output. -
XStreaming Desktop
Required only if you use Xbox remote play through XStreaming Desktop.
Titan Two And PS Remote Play
Titan Two and PS Remote Play setups only need the main Vanta download from this page.
A. Console Setup
1. Capture Card Setup
PS5 Users Must Disable HDCP
Disable HDCP before connecting your capture card or you will get a black screen.
Path: Settings → System → HDMI → HDCP → Off
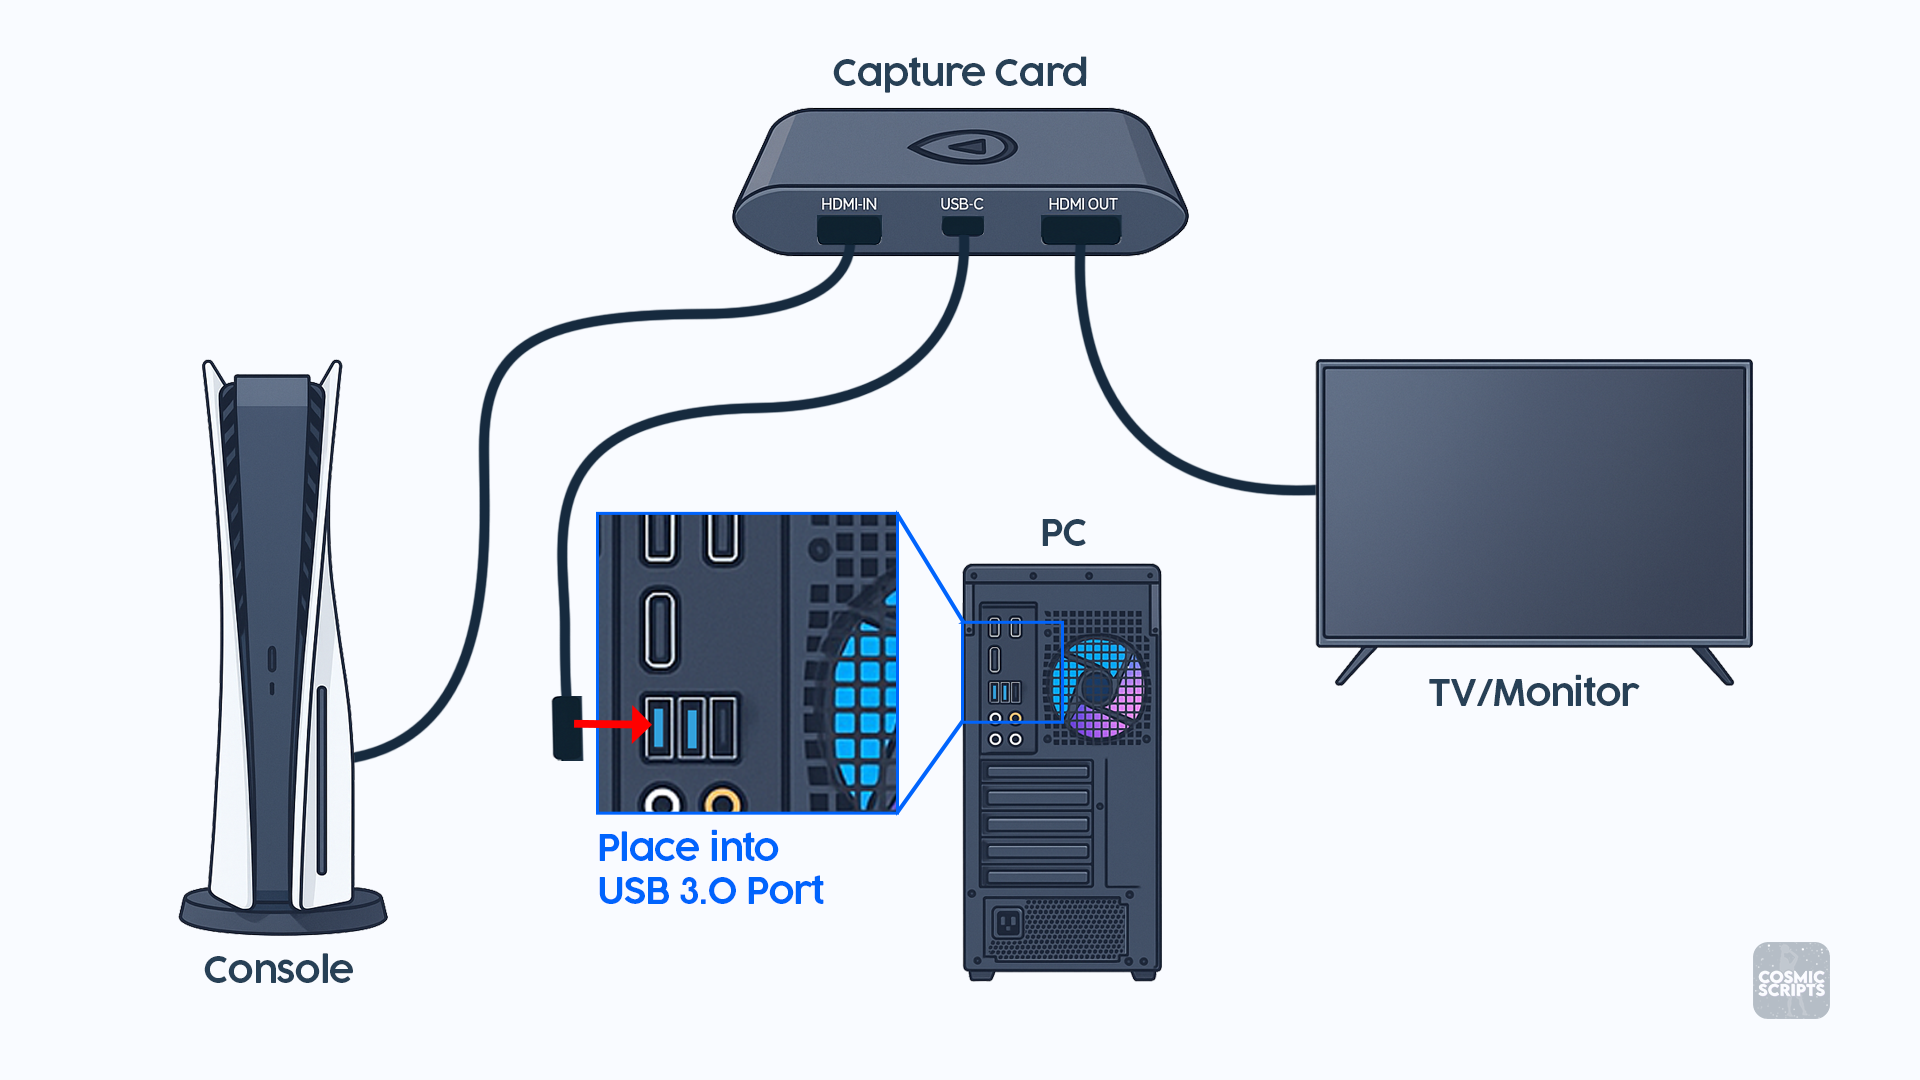
Connect your capture card using the standard wiring:
- Console HDMI OUT → Capture Card HDMI IN
- Capture Card USB → PC USB 3.0 (blue port)
- Capture Card HDMI OUT → TV/Monitor (your gameplay display)
2. Console Video Settings
These settings help Vanta keep your capture clean and avoid color inconsistencies.
Settings Reset on New Displays
Video settings often reset when changing HDMI devices.
Always verify them after connecting your capture card.
PlayStation 5
-
HDCP: Off
Settings → System → HDMI → HDCP -
HDR: Off
Settings → Screen and Video → HDR -
VRR: Off
Settings → Screen and Video → VRR -
RGB Range: Full
Settings → Screen and Video → RGB Range
Xbox Series X|S
-
HDR: Off
General → TV & display options → Video modes -
Color Space: PC RGB
General → TV & display options → Video fidelity & overscan → Color space -
Night Mode: Off
General → TV & display options → Night mode -
Color Filters: No correction selected
Accessibility → Color filters -
High Contrast: Off
Accessibility → High contrast
3. Ethernet USB Adapter Setup
A Ethernet USB Adapter is not required, however this provides more consistent timing when using Remote Play. Using an Adapter also allows you to use CosLink, the ultimate network tool that helps deliver a smoother, more consistent online experience by reducing sudden connection spikes and timing shifts.
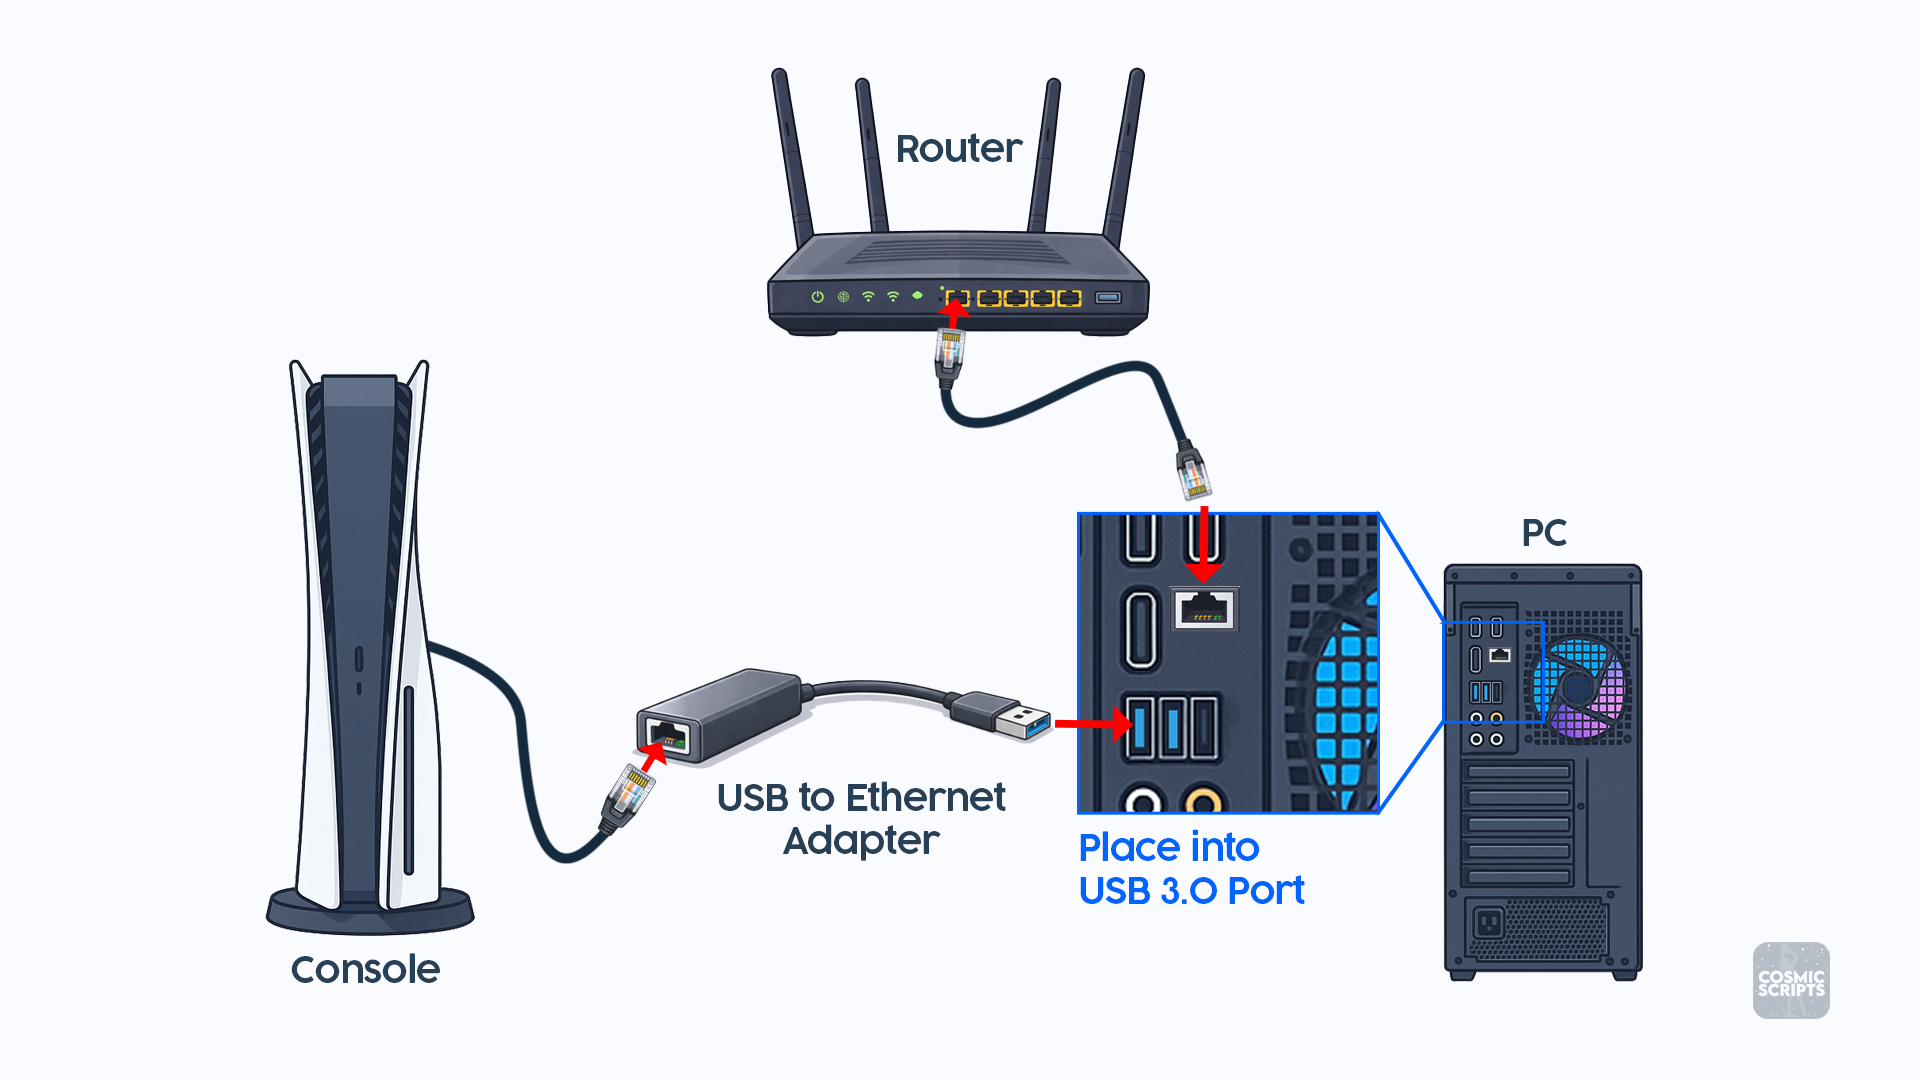
Adapter Connection
- Ethernet Cable from Router to PC
- Ethernet Cable from USB-Ethernet Adapter to Console
- USB-Ethernet Adapter into USB 3.0 Port (Blue)
Network Sharing
This step allows your console to receive internet access through your PC when using a USB-to-Ethernet adapter or direct Ethernet connection.
Required for USB Ethernet Setups
If your console is connected through your PC (instead of directly to the router), Internet Connection Sharing must be enabled.
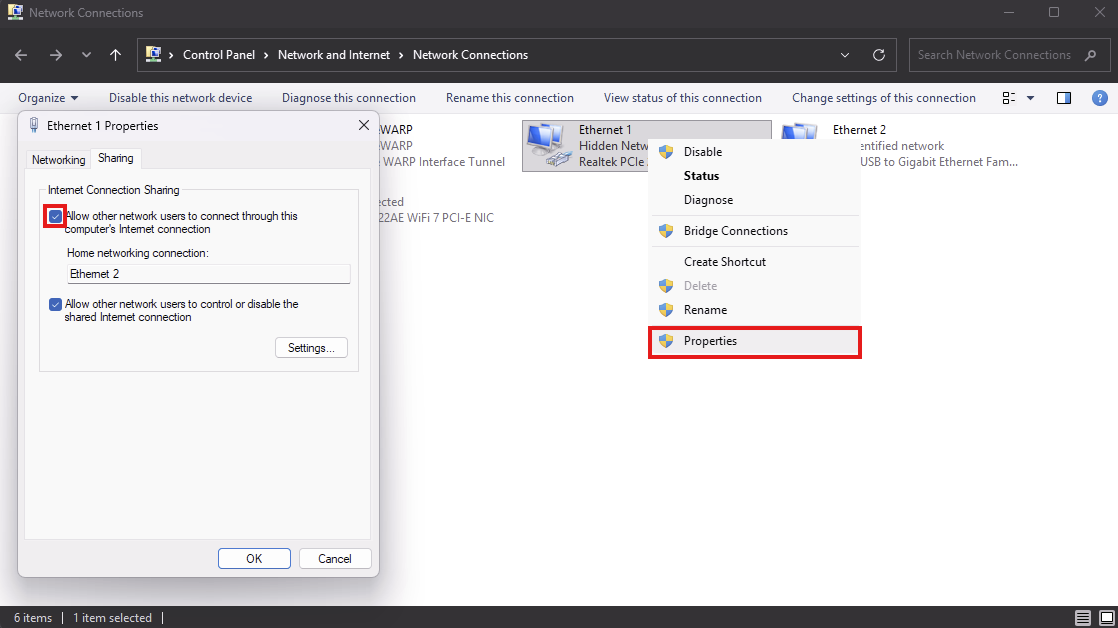
- Search PC for "View Network Connections"
- Identify primary adapter (Ethernet 1)
- Right-click the adapter and select Properties
- Open the Sharing tab
- Allow other network users to connect through this computer's Internet connection
- Select: Ethernet 2 (if applicable)
- Click
B. PC Setup (Steam)
1. Display Capture In Vanta
Use Vanta display capture first when Vanta is running on the same PC as the content you want to capture.
- Open Vanta.
- Open Capture Settings.
- Set Source to Display.
- Select the display you want Vanta to use.
- Choose your preferred resolution and FPS.
Recommended PC Capture
Use Vanta display capture first. Only use OBS Virtual Camera if display capture does not fit your setup.
2. Virtual Capture Card Setup
Use a virtual capture card, such as OBS Virtual Camera.
OBS Configuration:
-
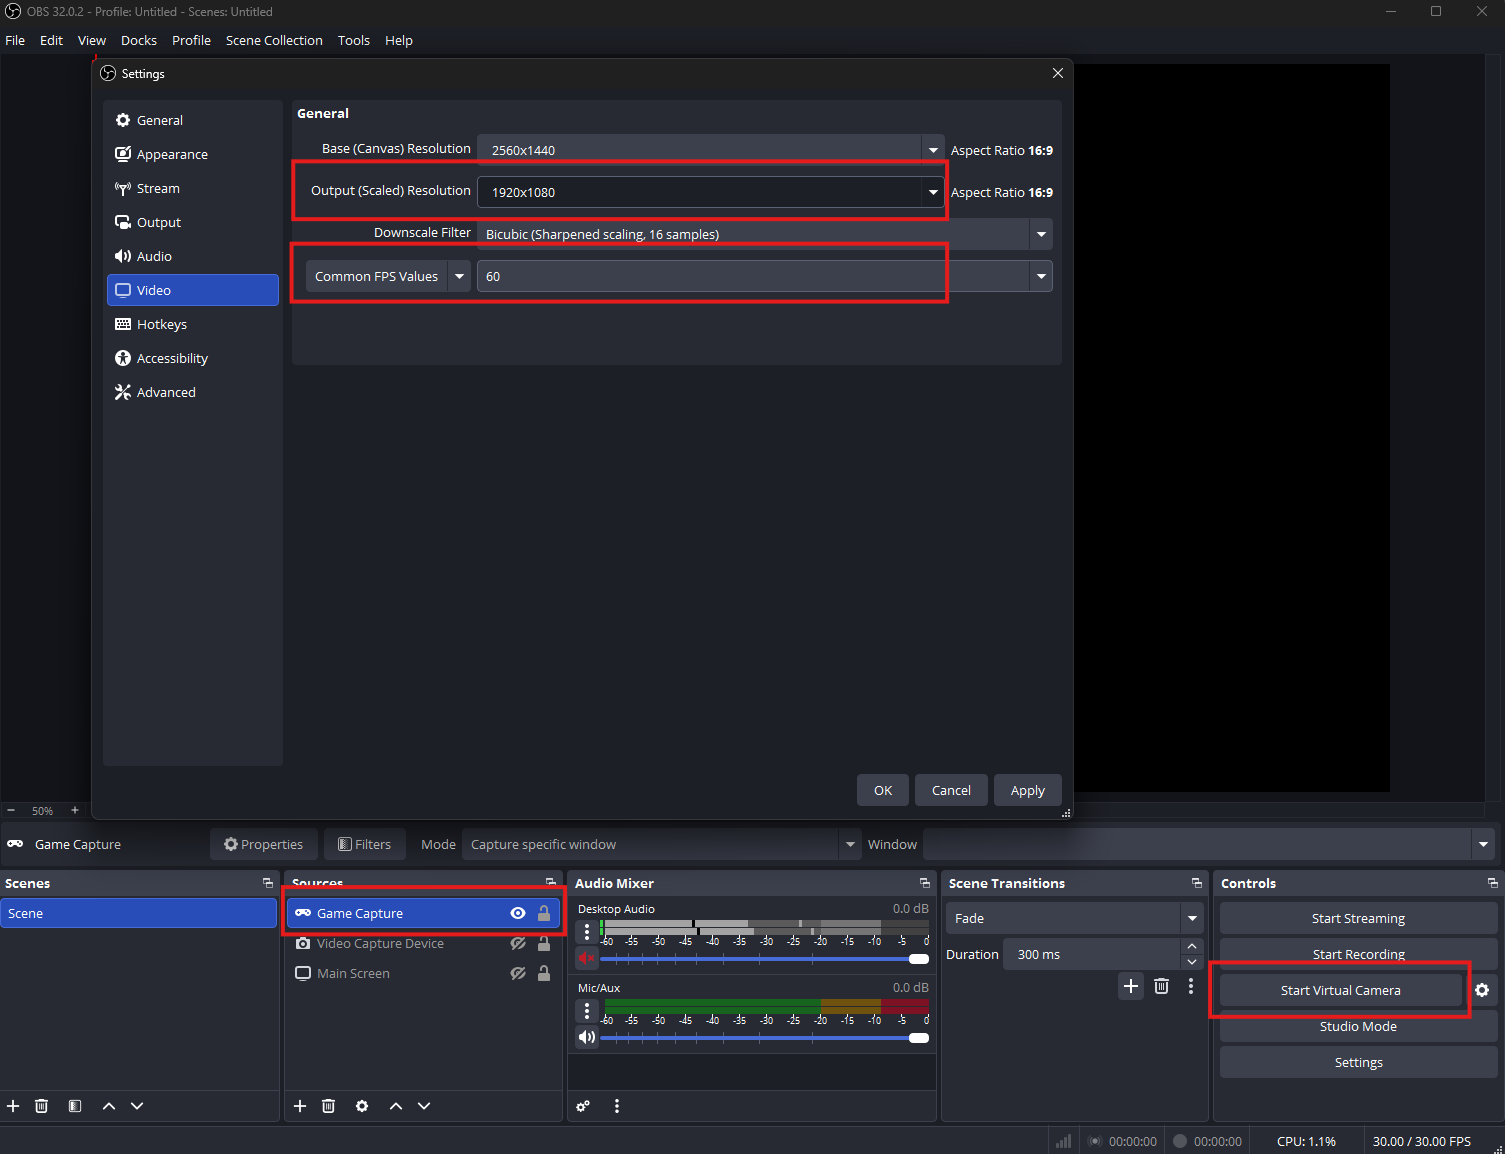
Video Settings:
- Resolution: 1920 × 1080
- FPS: 60
-
Source Setup:
- Add Source → Game Capture
- Mode: Capture Specific Window
- Window: Select your game
-
Start the Virtual Camera:
- Controls → Start Virtual Camera
Then open Vanta:
- Open Capture Settings.
- Set Source to Device.
- Select OBS Virtual Camera.
Continue To Output Modes
After your capture source and PC/console setup are ready, continue to the output mode that matches your setup: